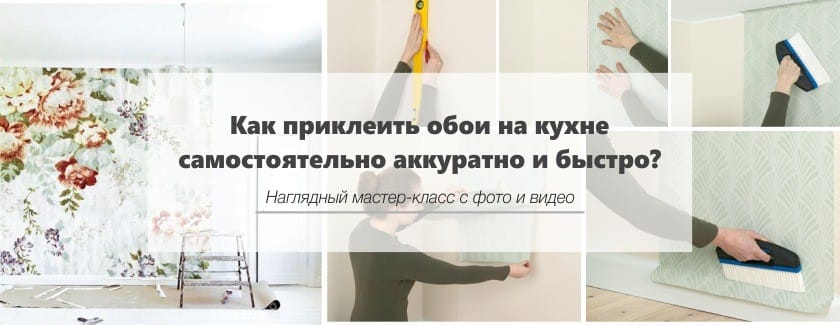
Pasting the kitchen wallpaper – this is not too complicated process, with which you can cope on your own. You just need to pick the right material, prepare the necessary tools and surfaces, observe the technology of cutting and gluing the canvas. Renovation of the walls is a wonderful way to change the interior of the kitchen quickly and relatively budgetarily.
Briefly about the species – which is better?
First you need to decide on the appropriate material for the kitchen and the desired design.
What to choose from the point of view of practicality? There are the following types of coatings:
- Paper;
- Non-woven;
- Vinyl;
- Textile;
- Liquid;
- Wallpapers of fiberglass.
Each of these materials can look beautiful, but, of course, they have different indicators of strength and moisture resistance.
On each roll you will find a marking on which you can determine how much the wallpaper is suitable for the kitchen. As you can see, some icons are underlined – it is desirable that your wallpaper had exactly such characteristics.
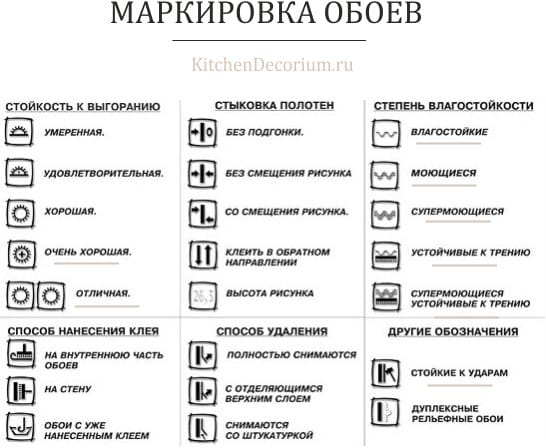
In the kitchen, the wallpaper must be washable, strong, light-and moisture-resistant. Briefly, our view:
- The best choice: vinyl wallpaper based on nonwoven fabric. The cloth carefully falls on the walls, looks beautiful and can be easily glued on its own, and besides this material is distinguished by high moisture resistance, plus, if your walls are not perfectly even, this option is most desirable.
- The worst choice: paper and textile wallpaper is better not to glue, because they are poorly cleaned and quickly deteriorate in the kitchen.
Choose a design – 7 main secrets
About the topic of choosing wallpaper in terms of color and pattern, you can say a lot, because this question really needs to be carefully thought through. After all, we ourselves are designers, and therefore, and understand the tones, prints, the correct combinations with furniture and walls in other rooms will have to. The color and design of the cloths are selected depending on the shape, size of the room, its level of natural light, your preferences.
Here are the 7 main rules in choosing the wallpaper design that you need to know:
- For well-lit rooms choose cold shades;
- Kitchens with windows facing north are decorated with wallpaper in warm shades;
- Small kitchens 5,6,7 square meters decorate with light wallpaper without complex drawings. One accent wall is admissible.
- Narrow kitchen becomes wider, when decorating walls in light colors and drawing in a longitudinal strip;
- Kitchen with low ceiling Walls in stripes or vertical pattern are shown;
- Win-win and the most versatile colors that always look beautiful: white, beige, gray, muted blue;
- Solid wallpaper – not only a tribute to fashion and always appropriate restraint, but also the best option for self-sticking easily and quickly, because they do not require the matching of patterns.
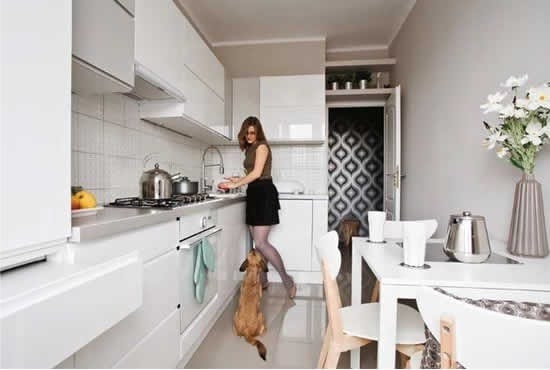
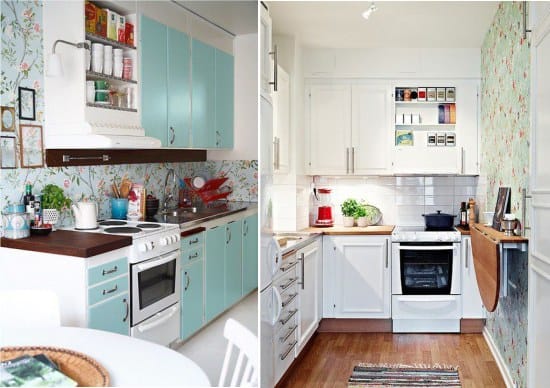
Advice! You can cover the walls with different wallpaper, creating interesting interior accents. To avoid problems of choice and doubt, if you want to create such a design yourself, without the help of a designer, you need to choose from one collection, where all the companion variants have already been carefully selected.
Correctly prepare the wall
Work always begins with the preparation of walls.
Step 1 . A qualitative result can not be provided if you do not first remove the old wallpaper and do not plaster the wall. All this is not difficult to do by one’s own hands.
To remove old wallpaper from the wall, use a metal spatula and atomizer (wet wallpaper removed from the wall easier). Old coatings – peeling paint and whitewash – also need to be removed.

Step 2 . After that, the walls must be leveled with the putty. Vinyl and non-woven wallpaper can glue surfaces with minor defects, but large irregularities, cracks and other – must be eliminated.

Advice! Keep in mind that under the non-woven wallpaper will be enough for one layer of putty, and for vinyl and even more paper need a more even surface.
Step 3. The last layer of putty must be sanded.
Step 4. And now a primer is needed. After such operations, your old walls will not be recognized, and all coatings will be glued on them without difficulty.
For more information on how to properly plaster yourself and align the walls under the wallpaper, see the following video:
Cooking tools
Deciding how to paste wallpaper in the kitchen, you can not ignore the issue of preparing tools.
To quickly cut the canvas, you need:
- Corner;
- The metal rulers are long;
- A knife with sharp replaceable blades;
- Good scissors;
- Yardstick.
And for gluing wallpaper you will need:
- Sprayer with water, metal spatula – to remove old layers of wallpaper;
- Plumb bob, level (conventional or laser);
- Rule, profile for vertical marking;
- Rollers or brushes to apply glue on the panels and on the walls;
- Wide, narrow rollers of rubber for smoothing the canvas;
- Bucket and drip tray;
- Water, a clean soft rag or brush.
Start work – cut the linen and prepare the glue
To understand how to properly paste wallpaper, you must first figure out the cutting of the roll. There are the following variants of cutting:
- Cut on the wall, before putting the roll in the right place and marking.
- Cut on the table, once measuring the height of the ceiling and adding to it 10 centimeters in reserve.
- The wallpaper with a pattern is cut taking into account the step of the repeating pattern – as a rule, this value is indicated on the package, but you can check by finding duplicate items.
Advice! If you are painting several paintings at once, then do not forget to sign them in the order in which they will be glued to the wall.
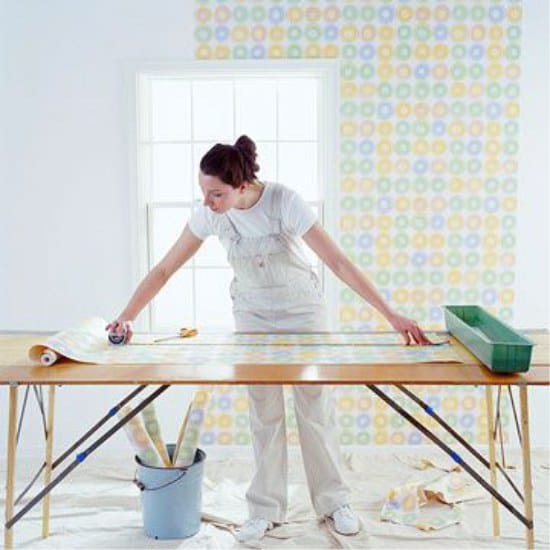
There is one more important point – dilution of glue. Adhesive composition is selected in accordance with the type of wallpaper material and diluted with careful adherence to instructions in cool water. The composition is mixed until an acidic consistency is obtained. More information about the types of glue and its preparation:
How to glue walls – turn-by-turn instructions
So, how to properly paste wallpaper? The walls are already fully prepared – old coverings were removed, and the surface – putty and primed. After the primer has dried, choose the options for applying the adhesive (depending on the type of material used):
- In the case of vinyl paper-based wallpaper, linens are greased;
- For gluing wallpaper on a non-woven base, the adhesive is applied to the walls.
It is recommended to apply wallpaper to both the wall and the canvas – this ensures better adhesion of the surfaces, in addition, the mating of the pattern and the alignment of the webs will be easier.
If you need to apply glue to the canvas, and not to the wall, then prepare a clean place for them in advance.
The glue is applied evenly to the wallpaper without missing, after which the cloths are doubled and left for a few minutes. Particular attention should be paid to the wall – in the place where the wallpaper will dock (because modern materials are glued to butt, and not overlapped). Start work should be from the center of the room, if it has 2 windows or from the corner of the wall where the window opening is located.

The first cloth is glued just in the corner – so that it would go to the next wall for 5-6 cm. Before gluing the first cloth, there must be a vertical along the construction plumb line or level – this line is drawn with a pencil on the wall, as shown in the photo above. Begin to glue the wallpaper on top, leveling the canvas exactly along the vertical line. At first, the top and edge of the material are exposed, and only the rag or brush is used for pressing, but not the roller. After the upper part of the canvas has been glued, the lower part is opened and also carefully leveled to the skirting.
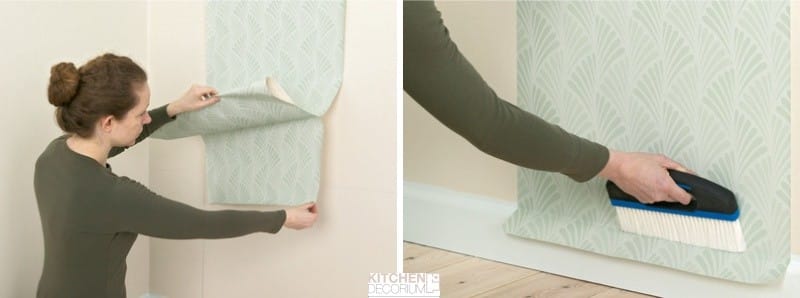
After the canvas is aligned and fixed, it is pressed against the pattern of the “Christmas tree” first in the center, and then – sideways, moving from top to bottom.
If a micro-gap forms between the webs at the joints, they can easily be moved. It will be easier to do this if the canvas is smeared with the wall. At the final stage, you must additionally grease the joints and walk along them with a short rubber roller for fixing.

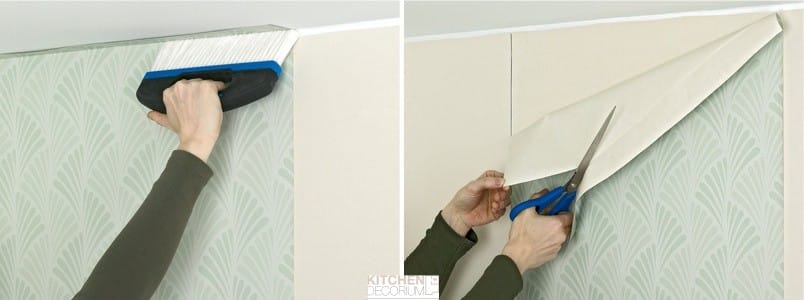
Then follow the quality control of gluing – the wallpaper should fit snugly against the wall without air bubbles. After the whole room is pasted and the canvas dries a little, you can trim the excess formed at the top and bottom. It is important to use a sharp knife so that there is no scoring at the cutting site or cut off with a pair of scissors at the folding point, as shown in the next photo.
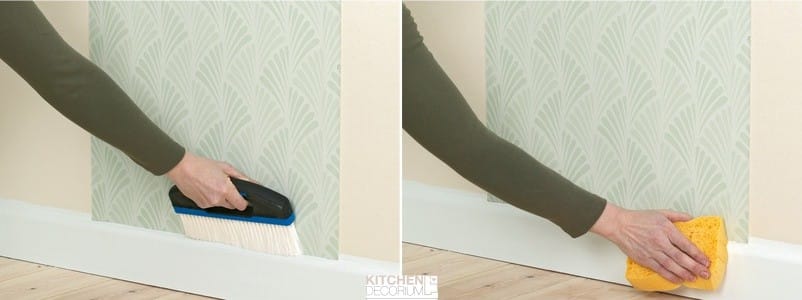
And how to paste the last painting? Measure the width of the wall that has not yet been glued and add to it 1.5 – 2 cm. (Photo 1). Cut the web of the desired width. Now this canvas is docked with the adjacent cloth, glue and iron the seam, and then in the corner vertically, iron the resulting overlap (with a rag or brush) (photo 2).
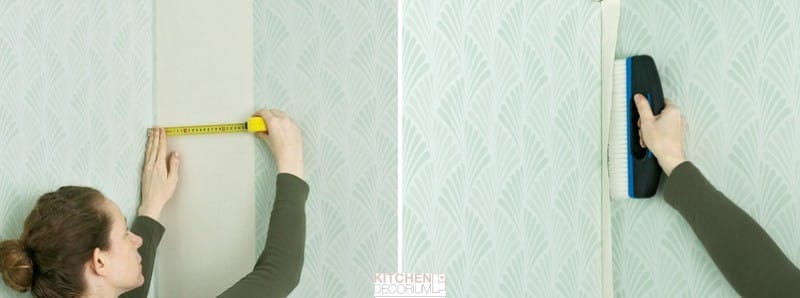
Carefully trim the excess in the corner, top and bottom. Remove the remainder of the adhesive with a sponge. Keep in mind that as a result, the drawing may not coincide perfectly, but it is not very noticeable in the corner.
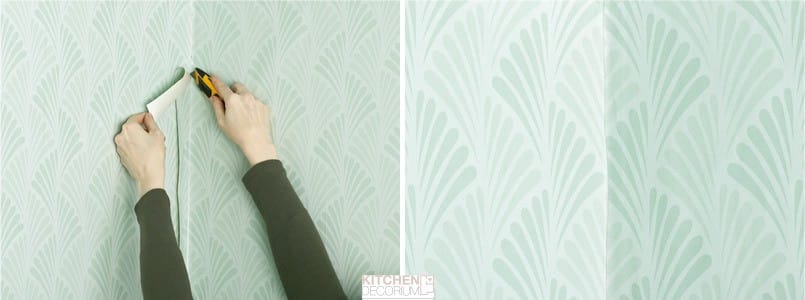
How to paste wallpaper near the door, the windows and in the corners?
In order to beautifully and professionally paste wallpaper on your hands, you need to pay special attention to work near windows and doors in the kitchen. It’s not difficult, the main thing is to know how to do it according to rules and common sense.
How to paste wallpaper near the window?

When you reach the window, glue the next cut as usual, that is, the canvas will protrude into the window opening. Make horizontal cuts on the canvas, bend and iron the paper as shown in photo 1. If the cut of the wallpaper does not reach the window, then it is necessary to glue an additional cut. Cutter cut the canvas so that it perfectly frames the windowsill (photo 2). Cut off all unnecessary and iron (photo 3). Now we paste the upper part of the window opening as shown in the photo.
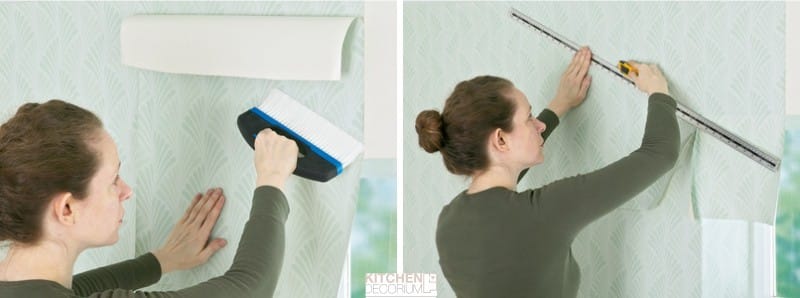
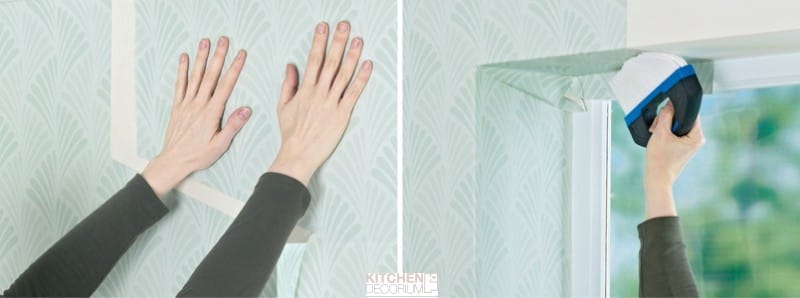
The side walls and top can also not be pasted. Just glue the pieces of the canvas, joining the picture, and at the edges of the window opening, if desired, install the corners.
How to cover the wall with wallpaper near the door?
When you reach the door, attach the sheet as usual with the door to the door. Cut off the excess (the piece that covered the door) with scissors, leaving a few centimeters of excess paper on top and sides (photo 1). Then make a small slit diagonally as shown in photo 2.
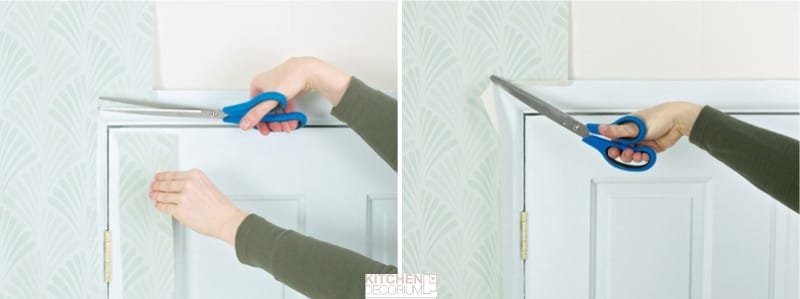
Cut off excess paper at the top of the door frame and at the bottom. Use the edge of the door frame as a guide. Iron the wallpaper along the door.

Now we will decorate the wall above the door. Hang a short cut of cloth above the door. Dock the pattern and cut off the excess at the ceiling and top of the door (photo 1). The other side of the door, paint the same principle that was described above. But do not cut the excess along the vertical (along the edge of the body of the door) until you glue the next sheet, so that later you can correct the irregularities.
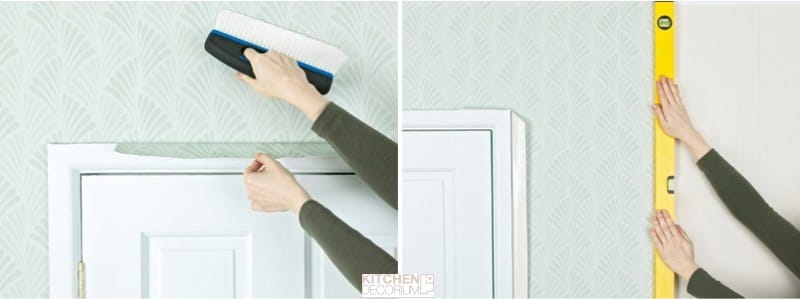
How to paste wallpaper in the corners?
There are internal corners in any room. You need to glue them as shown in the photo instructions below.
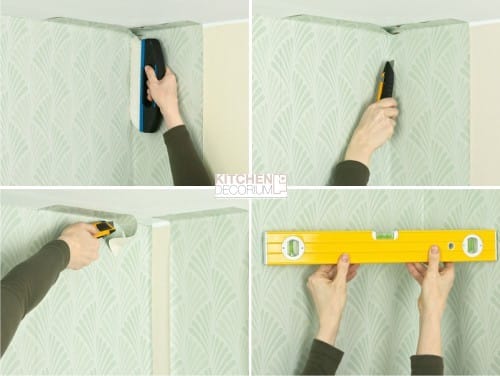
But the protruding corners are not in all the kitchens, but in many.
Border curb and wallpaper near outlets, switches, batteries
So, how to paste wallpaper in the kitchen with your own hands, in general, we figured out. And how to properly decorate the wall near the battery, sockets and switches? Let’s understand.
How to properly paste the wallpaper near the battery?
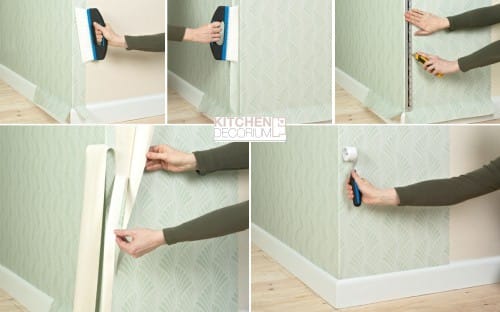
Start to wallpaper the wall above the radiator as usual, and pasting the canvas to the edge of the radiator, let it hang over the surface of the radiator (photo 1). Then cut the wallpaper so that they go a little behind the radiator (photo 2). Now use a roller to glue them behind the battery (photo 3).

How to decorate the wallpaper, where are the sockets and switches?
- Turn off the lights. Hang the paper on the switch panel. Note the position of the switch angles as shown in the figure.
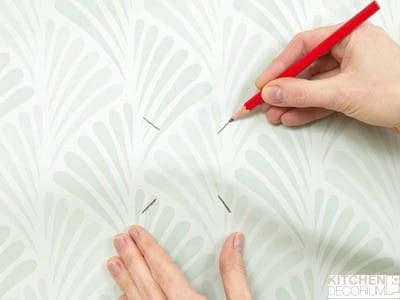
- With a stationery knife, make a diagonal slit from one corner to the opposite corner, you should get four triangular flaps. Fold these flaps along the edge of the wall and cut the resulting unnecessary triangles along the fold.
- Loosen the cover of the switch panel or outlet and pull it out a little through the hole.
- Pull the paper under the switch panel. Then install it back and remove the excess glue. Do not turn on the power until it is completely dry.
How correctly to paste a border?
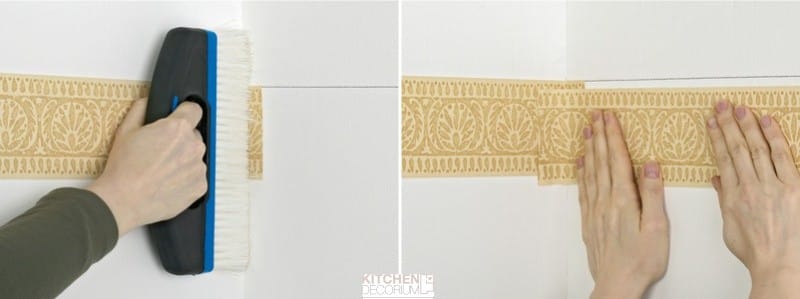
- Draw pencil control lines on the wall at a height where you want to paste a border and paste it slightly on the adjacent wall. (photo 1);
- On the second wall, glue the border in the same way to create an overlap in the corner, and then trim the top layer of the border neatly in the corner (image 2).
That’s it.
If you want to learn more about how to manually paste wallpaper in the kitchen in difficult places, look at the video:


